A CA is necessary if you want to configure any of these settings in an Intel AMT device:
- Remote Access
- Transport Layer Security
- 802.1x Setups
- End-Point Access Control
During configuration of these settings, Intel SCS sends a request to a CA software application to generate a certificate. Intel SCS puts the generated certificate in the Intel AMT device.
Intel SCS supports the Standalone and Enterprise versions of Microsoft CA. The Microsoft CA can have a hierarchy of CAs, with subordinate CAs and a root CA. In my lab environment I only have a root CA so this guide will show the setup of this. At the customer where I implemented this I was using a subordinate CA so it’s also fully possible to use a subordinate CA if your configuration requires that.
These features require a Standalone root CA or an Enterprise root CA:
- Transport Layer Security (including mutual authentication)
- Remote Access with password-based authentication
These features require an Enterprise root CA:
- Remote Access with certificate-based authentication
- 802.1x setups (Wired or WiFi)
- EAC settings
I will here go through the steps for configuring your Enterprise Root CA and Templates required for the integration between Configuration Manager 2012 R2 and Intel SCS 9.0. I’m running my Enterprise Root CA on Windows Server 2012 R2, so some of the settings might be found on different places in earlier versions on Windows Server. If you need guidance on installing your CA this can be found on TechNet for Windows Server 2008 and Windows Server 2012.
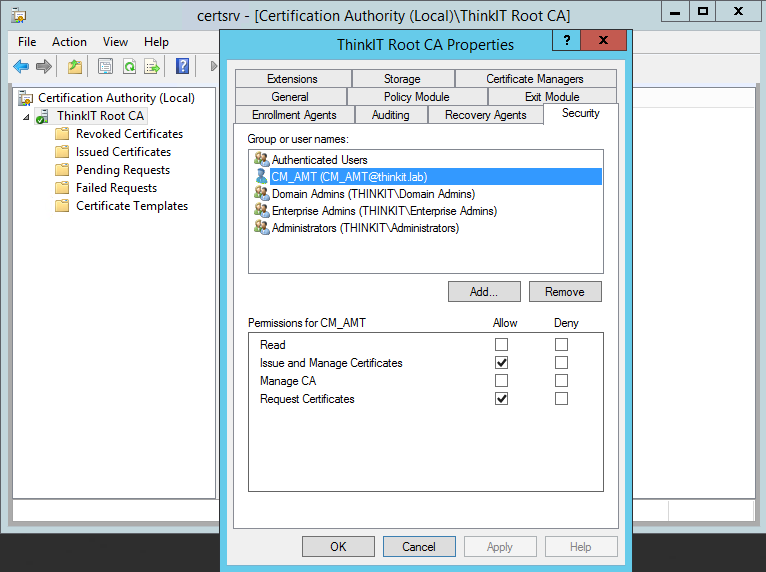
Required Permissions on the CA
- Configure the required permissions on the CA, these permissions are required on the CA by the user account running Intel SCS component doing the configuration; (This is the CM_AMT account created in Part 2 of this series)
- Issue and Manage Certificates
- Request Certificates
Request Handling
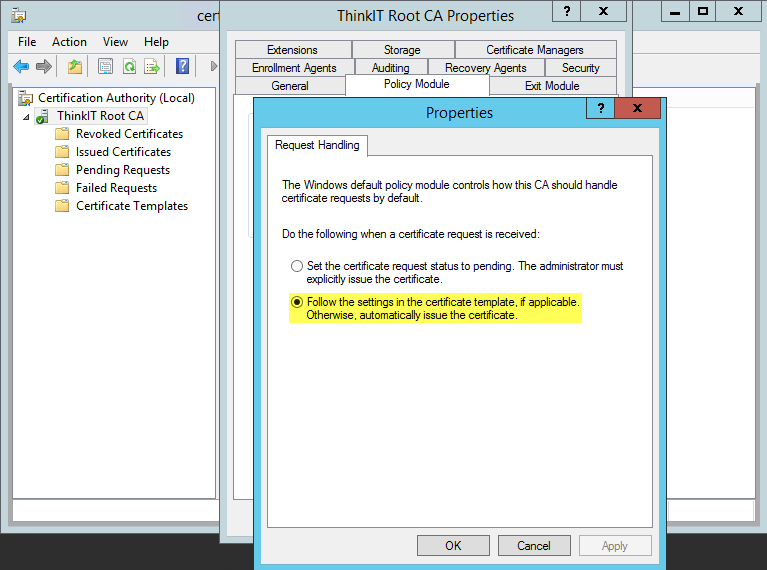
- Certification Authorities include settings that define how certificate requests are handled. Intel SCS does not support pending certificate requests. If during configuration the CA puts the certificate into the “Pending Requests” state, Intel SCS returns an error (#35). Thus, you must make sure that the CA and the templates used by Intel SCS are not defined to put certificate requests into a pending state. For Enterprise and Standalone CAs, request handling is defined in the Request Handling tab (right-click the CA and select Properties > Policy Module > Properties). Make sure that the correct option is selected (shown in yellow in the screenshot below).
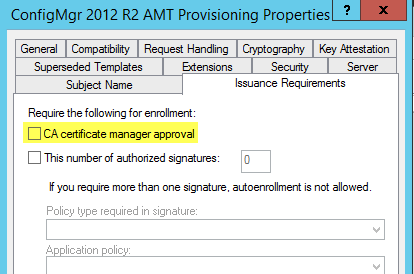
For Enterprise CAs, you must also make sure that the templates used by Intel SCS are not defined to require approval. Make sure that the CA certificate manager approval check box is NOT selected (shown in yellow i the screenshot below).
Create the AMT Client Configuration Certificate Template
First we create a Template for Intel AMT features to use certificate-based authentication
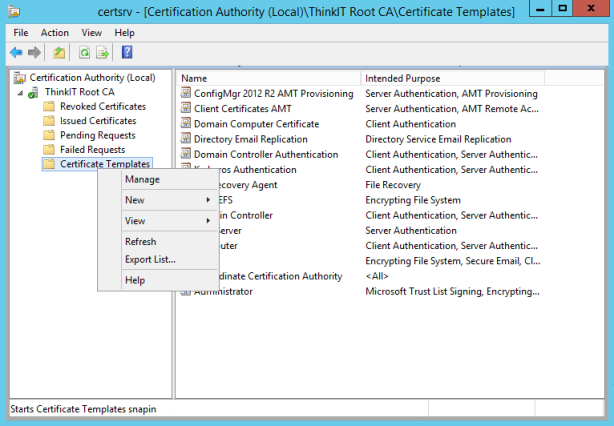
- On the server that has Certificate Services installed, in the Certification Authority console, right-click Certificate Templates, and then click Manage to load the Certificate Templates console.
- In the results pane, right-click the entry that displays User in the Template Display Name column, and then click Duplicate Template.
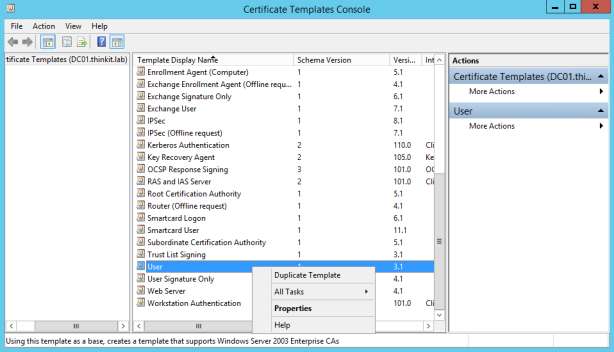
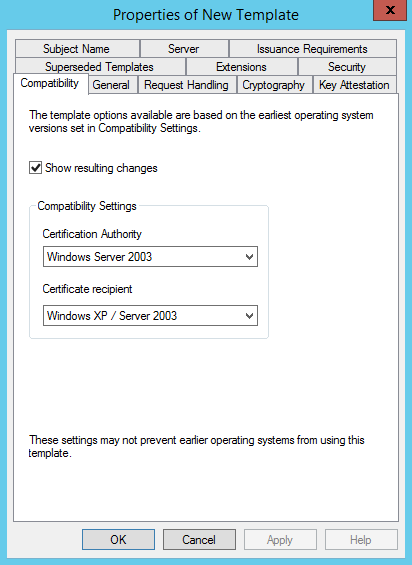
- In the Properties of New Template dialog box, on the Compatibility tab, ensure that Windows Server 2003 is selected for Certification Authority and Windows XP/Server 2003 is selected for Certificate recipient.

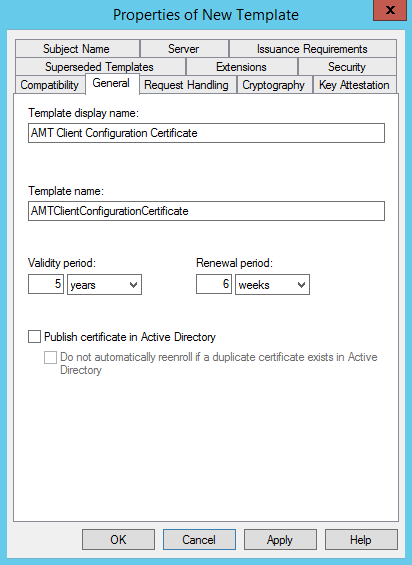
- In the Properties of New Template dialog box, on the General tab, enter a template name for the AMT provisioning certificate template. I’ve used AMT Client Configuration Certificate in my example.

- Make sure that the Publish certificate in Active Directory check box is NOT selected.
- Change the validity and renewal periods as required by your policy. I’ve selected 5 years validity period and 6 weeks renewal period.
- In the Properties of New Template dialog box, on the Cryptography tab, in the list of providers, mark the check box beside Microsoft Strong Cryptographic Provider.

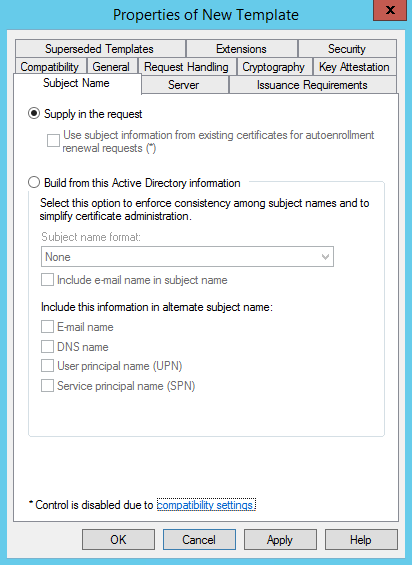
- In the Properties of New Template dialog box, on the Subject Name tab, select Supply in the request. (If you get a waring dialog box, click OK on it)
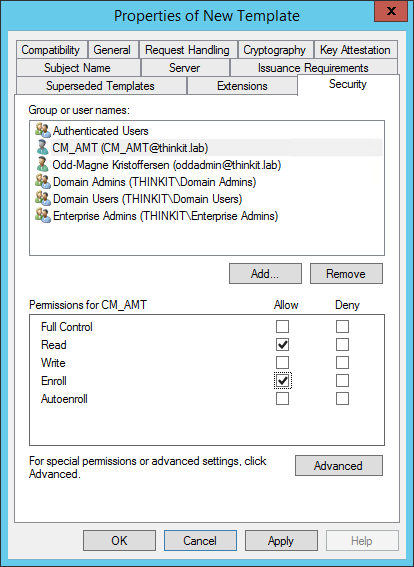
- In the Properties of New Template dialog box, on the Security tab, add the user running the Configurator with Read and Enroll permissions. (This is the CM_AMT user we created in Part 2 of this series)
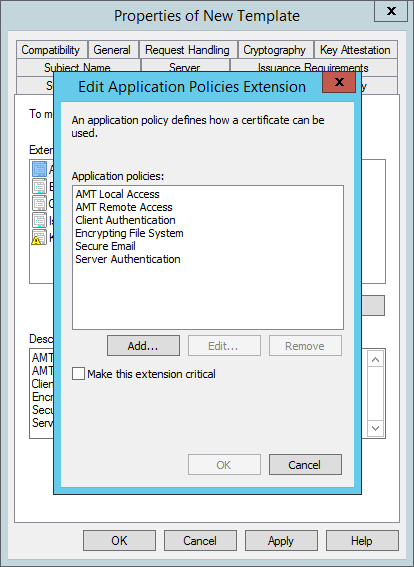
- In the Properties of New Template dialog box, on the Extensions tab, from the list of extensions, select Application Policies and click Edit. The Edit Application Policies Extension window opens.
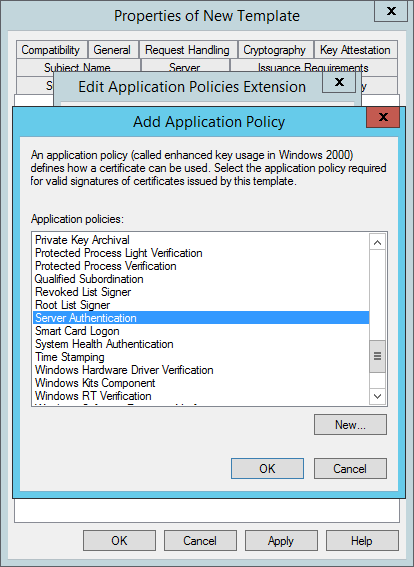
- Click Add. The Add Application Policy window opens.
- From the list of Application policies, select Server Authentication and click OK.

- Back in the Edit Application Policies Extension window, click Add again. The Add Application Policy window opens.
- In the Add Application Policy window click New.
- In the New Application Policy window, type AMT Local Access in the Name field, and then type the following number for the Object identifier: 2.16.840.1.113741.1.2.2. Click OK.

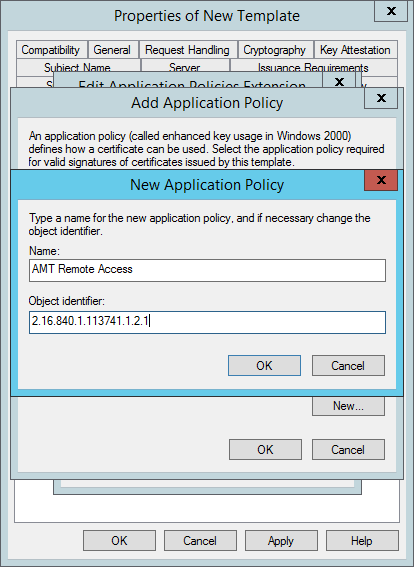
- Back in the Add Application Policy window click New.
- In the New Application Policy window, type AMT Remote Access in the Name field, and then type the following number for the Object identifier: 2.16.840.1.113741.1.2.1. Click OK.

- Back in the Add Application Policy window hold CTRL in and select both AMT Local Access and AMT Remote Access and then click OK.
- You should then be back in the Edit Application Policies Extension window, and it should look like this;

- Click OK to return to the Properties of New Template window.
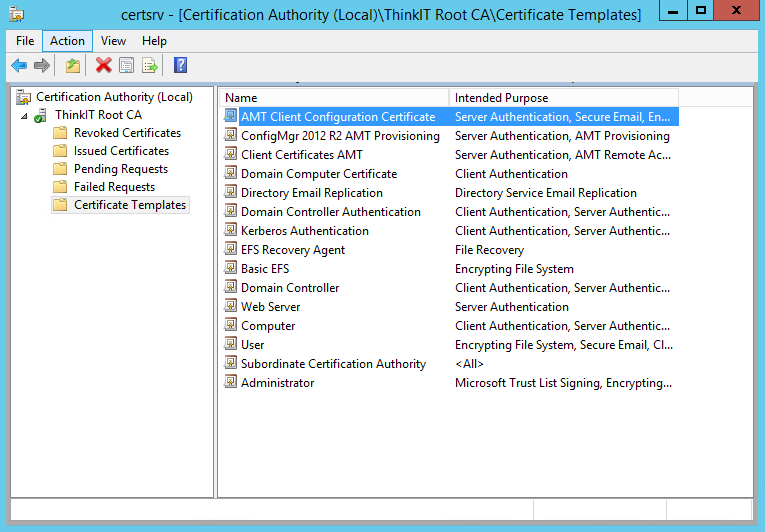
- Click OK, and close the Certificate Templates console.
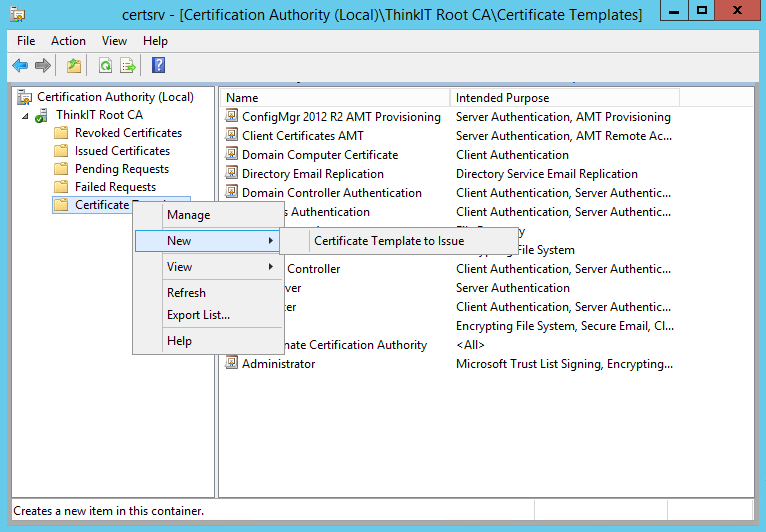
- In Certification Authority, right-click Certificate Templates, click New, and then click Certificate Template to Issue.
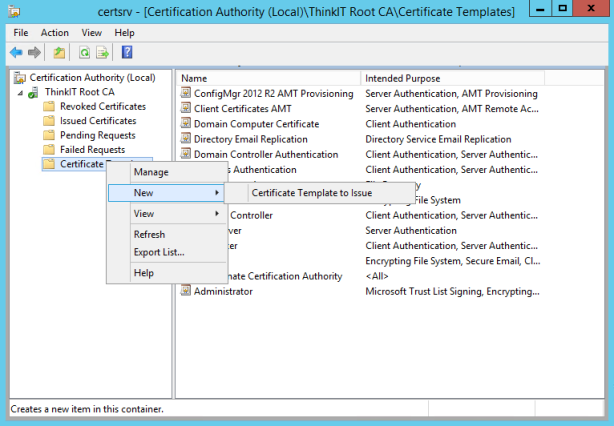
- Select the template that you just created (AMT Client Configuration Certificate) and click OK. The Enable Certificate Templates window closes and the template is added to the right pane with the other certificate templates.


Create the AMT Provisioning Certificate Template
Second we create the Provisioning Certificate Template for Configuration Manager 2012 R2, this certificate is needed so we can configure the Out Of Band Service Point.
- On the server that has Certificate Services installed, in the Certification Authority console, right-click Certificate Templates, and then click Manage to load the Certificate Templates console.
- In the results pane, right-click the entry that displays Web Server in the Template Display Name column, and then click Duplicate Template.
- In the Properties of New Template dialog box, on the Compatibility tab, ensure that Windows Server 2003 is selected for Certification Authority and Windows XP/Server 2003 is selected for Certificate recipient.
- In the Properties of New Template dialog box, on the General tab, enter a template name for the AMT provisioning certificate template, such as ConfigMgr 2012 R2 AMT Provisioning.
- Click the Subject Name tab, select Build from this Active Directory information, and then select Common name.
- Click the Extensions tab, make sure Application Policies is selected, and then click Edit.
- In the Edit Application Policies Extension dialog box, click Add.
- In the Add Application Policy dialog box, click New.
- In the New Application Policy dialog box, type AMT Provisioning in the Name field, and then type the following number for the Object identifier: 2.16.840.1.113741.1.2.3.
- Click OK, and then click OK in the Add Application Policy dialog box.
- Click OK in the Edit Application Policies Extension dialog box.
- In the Properties of New Template dialog box, you should now see the following listed as the Application Policies description: Server Authentication and AMT Provisioning.
- Click the Security tab, and remove the Enroll permission from the security groups Domain Admins and Enterprise Admins.
- Click Add, enter the name of the computer account for the out of band service point site system role, and then click OK.
- Select the Enroll permission for this group, and do NOT clear the Read permission.
- Click OK, and close the Certificate Templates console.
- In Certification Authority, right-click Certificate Templates, click New, and then click Certificate Template to Issue.
- In the Enable Certificate Templates dialog box, select the new template that you have just created, ConfigMgr 2012 R2 AMT Provisioning, and then click OK.
The AMT provisioning certificate from your internal CA is now ready to be installed on the band service point server. (Microsoft have this guide posted on TechNet also).
Install the AMT Provisioning Certificate
We then need to install the AMT Provisioning Certificate on our Configuration Manager server that will run the Out Of Band Service Point.
- Restart the member server that runs IIS, to ensure it can access the certificate template with the configured permission.
- Click Start, click Run, and type mmc.exe. In the empty console, click File, and then click Add/Remove Snap-in.
- In the Add or Remove Snap-ins dialog box, select Certificates from the list of Available snap-ins, and then click Add.
- In the Certificate snap-in dialog box, select Computer account, and then click Next.
- In the Select Computer dialog box, ensure Local computer: (the computer this console is running on) is selected, and then click Finish.
- In the Add or Remove Snap-ins dialog box, click OK.
- In the console, expand Certificates (Local Computer), and then click Personal.
- Right-click Certificates, click All Tasks, and then click Request New Certificate.
- On the Before You Begin page, click Next.
- If you see the Select Certificate Enrollment Policy page, click Next.
- On the Request Certificates page, select ConfigMgr 2012 R2 AMT Provisioning from the list of displayed certificates, and then click Enroll.
- On the Certificates Installation Results page, wait until the certificate is installed, and then click Finish.
- Close Certificates (Local Computer).
The AMT provisioning certificate from your internal CA is now installed and is ready to be selected in the out of band service point properties. (Microsoft have this guide posted on TechNet also).
Previous Postings in this series:
Integrating Configuration Manager 2012 R2 with Intel SCS 9.0 – Part 1 : Introduction
Integrating Configuration Manager 2012 R2 with Intel SCS 9.0 – Part 2 : Active Directory

Hello all,
This procedure is perfect, but i would like to know when you will be added the final.
Regards.
[…] the Server Certificate Template drop-down list, select the template that you defined for TLS in Part 3 of this series; AMT Client Configuration […]
[…] Certificate page, click Browse to select the AMT provisioning certificate that you created in Part 3 of this series. If you have multiple certificates to choose from and are unsure of which […]
There are a couple questions/comments I have about this: 1) Because the certificate is based of the user template, then Domain Users have the enroll permission by default. Since you now let the subject name get supplied in the request, that permission should be removed. 2) Do you know why is the Microsoft Strong Cryptographic Provider required? 3) Does the enrollment account really need the “◦Issue and Manage Certificates” permission on the CA? It seems like the permission on the template should be enough without compromising access to other templates.
I’d love to hear your feedback. This is a great and helpful series. However, I love to keep things as secure as possible even if it means minor inconveniences.
Nice catch, Rob S. It looks like you are correct. The enrollment account did not need extra permissions on “root-level” for read and enrollment (for all) or on the template itself in my testing. Works fine with the default (authenticated users can read, domain users can enroll, the enrollment account is part of both those groups).
[…] Integrating Configuration Manager 2012 R2 with Intel SCS 9.0 – Part 2 : Active Directory Integrating Configuration Manager 2012 R2 with Intel SCS 9.0 – Part 3 : Certification Authority Integrating Configuration Manager 2012 R2 with Intel SCS 9.0 – Part 4 : Configuration Profiles […]
[…] Integrating Configuration Manager 2012 R2 with Intel SCS 9.0 – Part 2 : Active Directory Integrating Configuration Manager 2012 R2 with Intel SCS 9.0 – Part 3 : Certification Authority Integrating Configuration Manager 2012 R2 with Intel SCS 9.0 – Part 4 : Configuration Profiles […]
[…] Integrating Configuration Manager 2012 R2 with Intel SCS 9.0 – Part 2 : Active Directory Integrating Configuration Manager 2012 R2 with Intel SCS 9.0 – Part 3 : Certification Authority Integrating Configuration Manager 2012 R2 with Intel SCS 9.0 – Part 4 : Configuration Profiles […]
Hi, Have one additional question, if using the specified method with Internal CA for Provisioning Certificate, do we still need to insert the thumbprint into the AMT Device?
Hi, this guide is using Host Based Configuration, so you don’t have to insert the thumbprint into the AMT Device. If you’re using the integration With RCS for Remote Configuration you’ll have to insert the thumbprint.
Hi, is it possible to install SCS on the same server as CA?
I can’t enroll the ConfigMgr 2012 R2 AMT Provisioning certificate on the SCCM server. It says more details is required. Looking online, it says to click on link to configure settings. Then go to the subject tab. Only change the Alternative name, Select DNS and enter the FQDN of the sccm server. I completed those steps but still cannot enroll as it says “More information is required to enroll for this certificate.” Any ideas what I might have missed?